构建后操作
2021-05-02 大约 5 分钟
传统的(基于Web的)Jenkins自由风格类型任务包含一个构建后操作部分,在那里用户可以添加一些在构建结束后一定发生的行为,不管构建的状态是成功、失败或者被中止。我们可以在脚本式和声明式流水线中复制这种功能。脚本式流水线依靠编程结构来仿效这个功能,而声明式流水线使用内置的功能实现。
我的jenkins版本:2.291
# 构建后发送通知
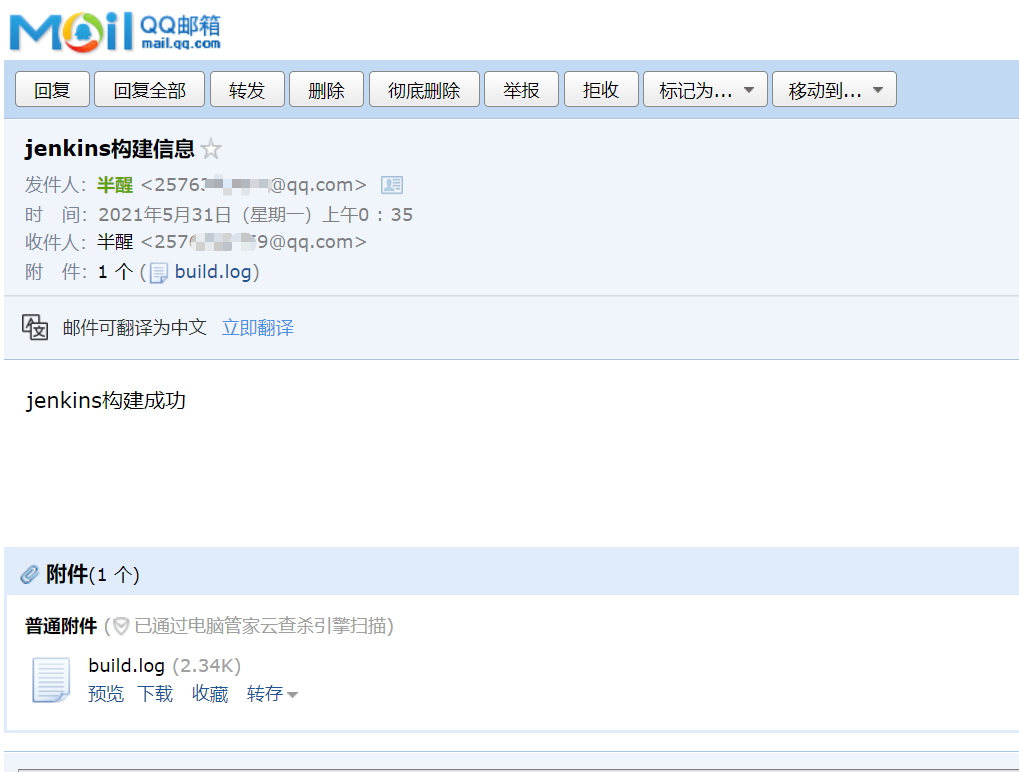
在项目部署结束后,我们总希望可以得到一些通知例如:构建状态、构建日志等,所以项目构建完成后发送一些通知,是常见的需求
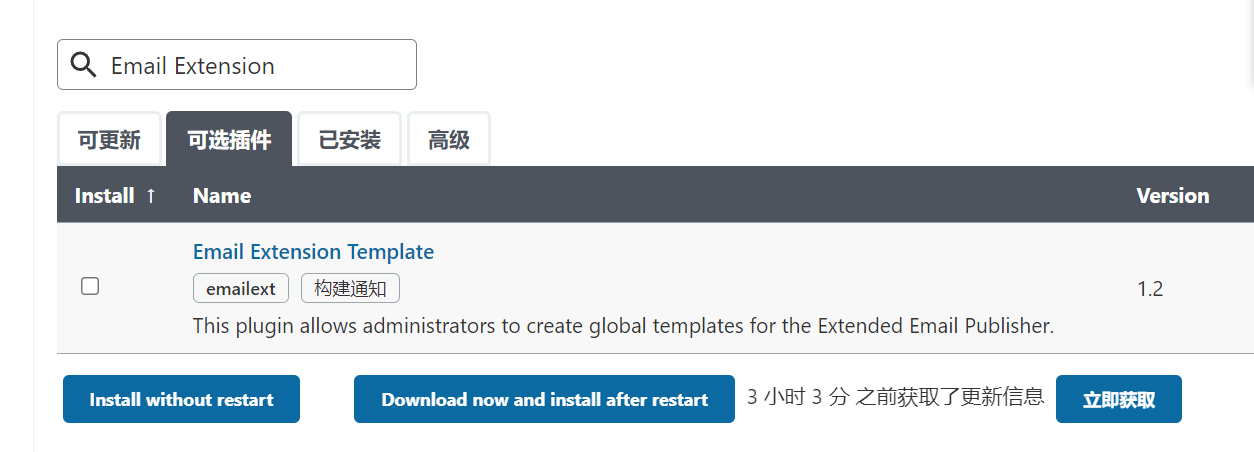
# 安装插件;
进入:系统管理->插件管理;
搜索插件:
Email Extension;选中然后安装【建议安装完成重启一下jenkins服务】;
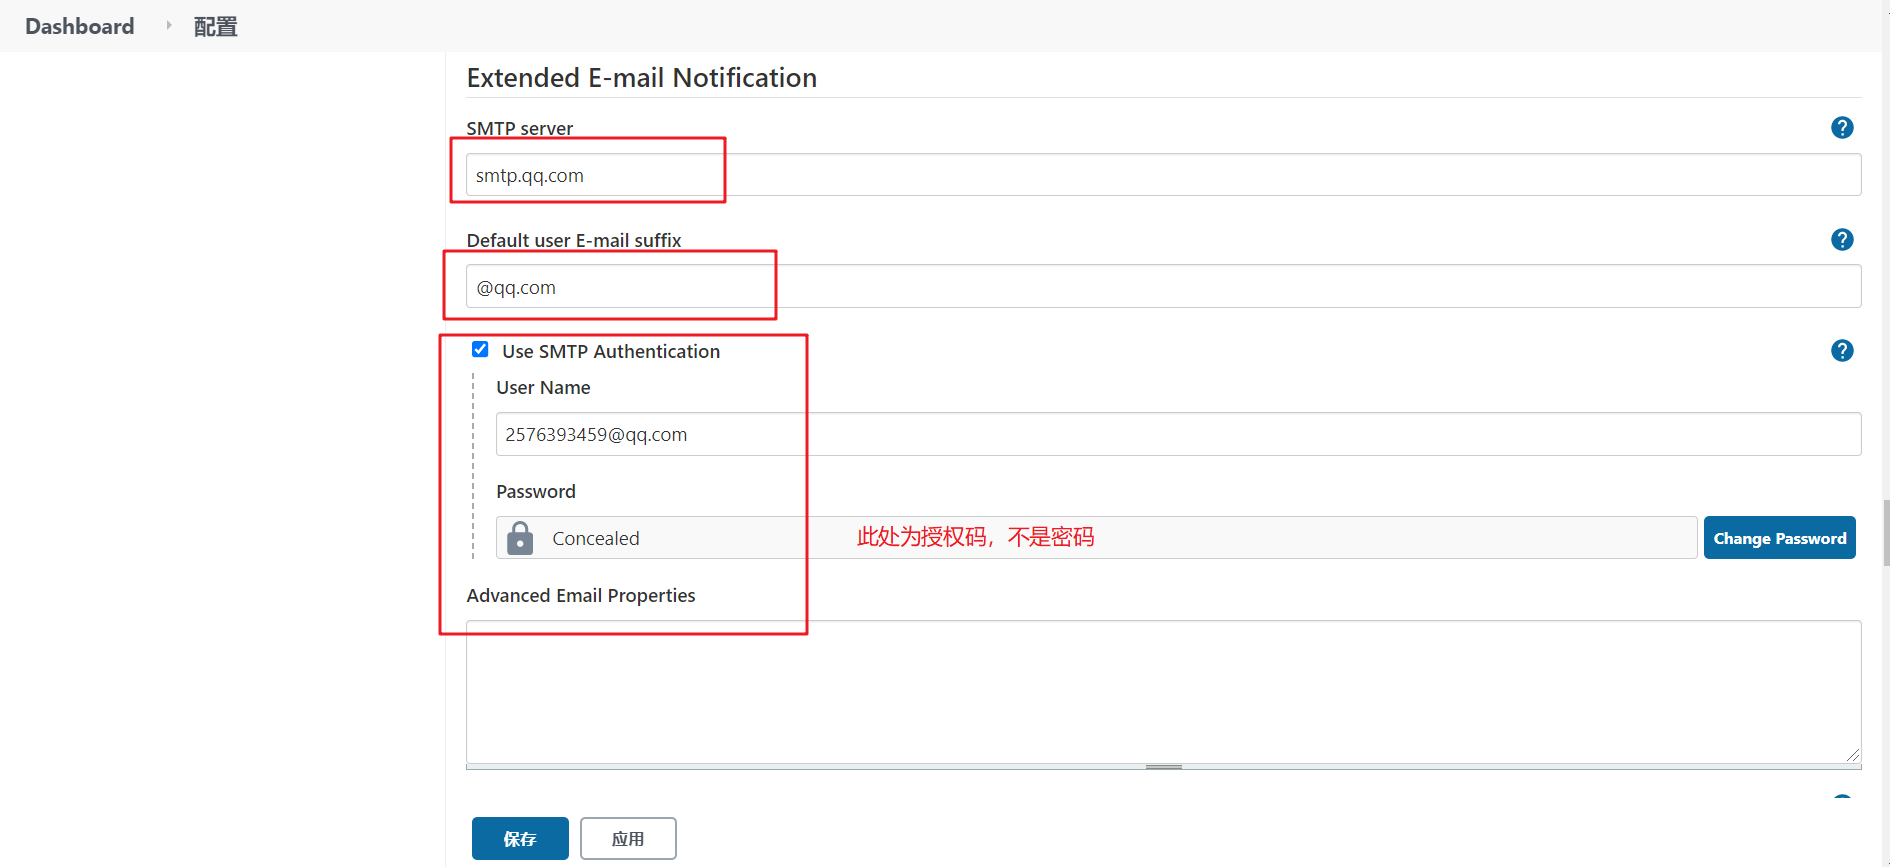
# 系统配置;
进入:系统管理-> 系统配置
找到:
Extended E-mail Notification这一项;
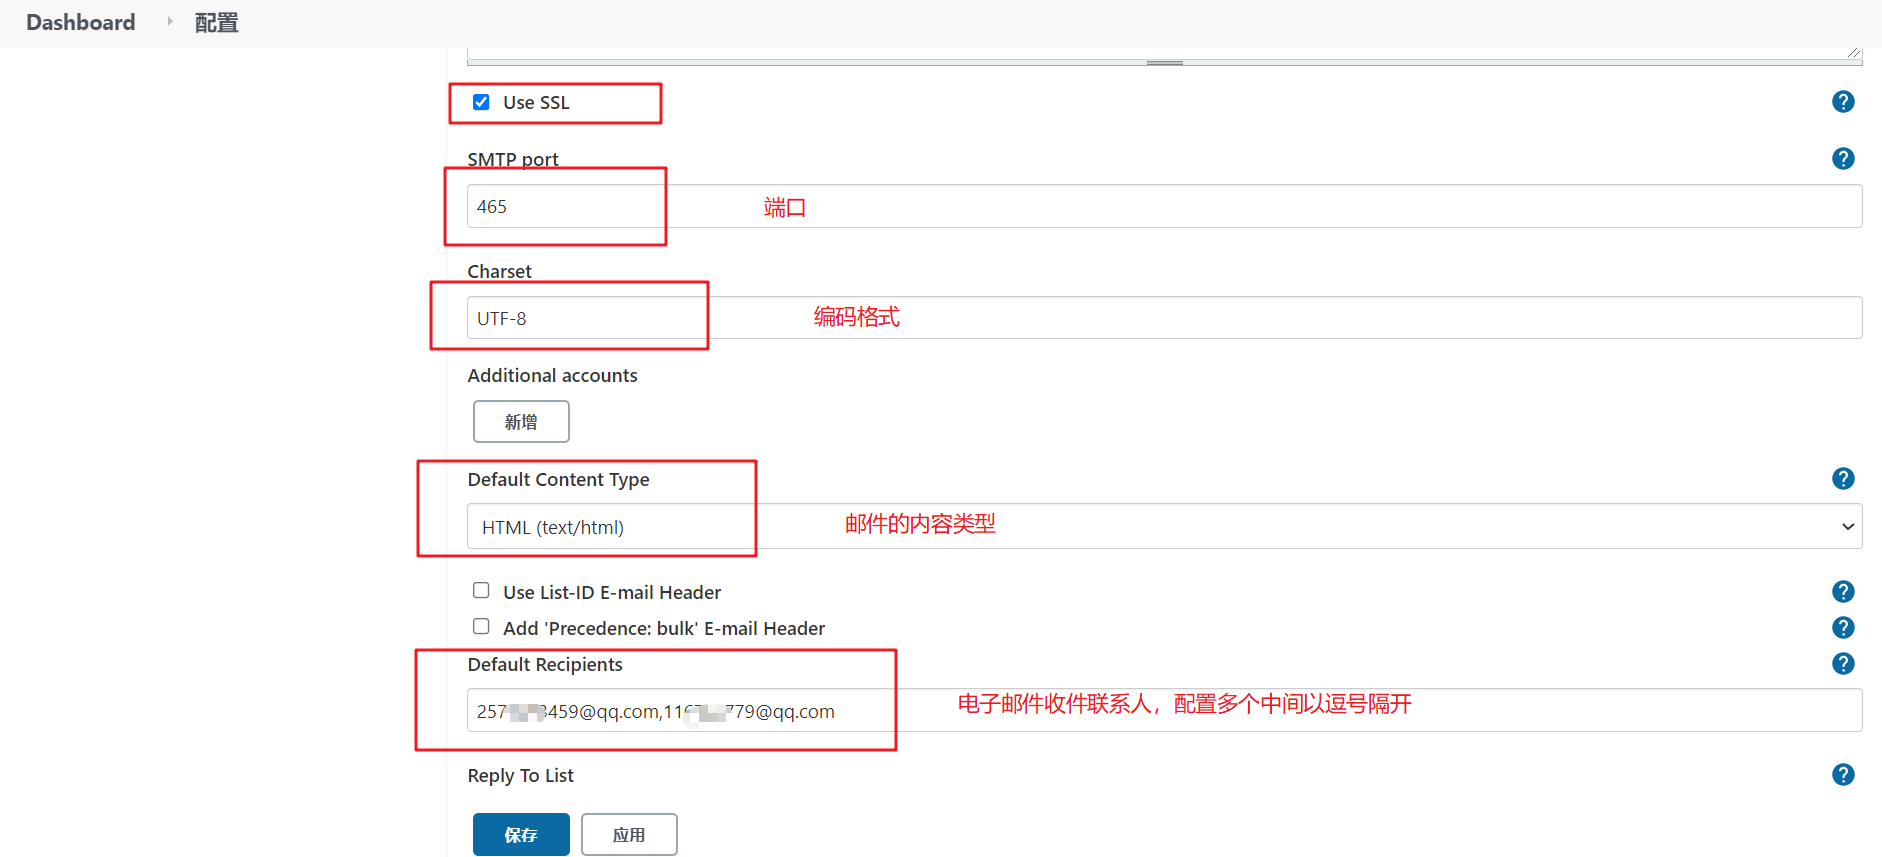
填写表单;

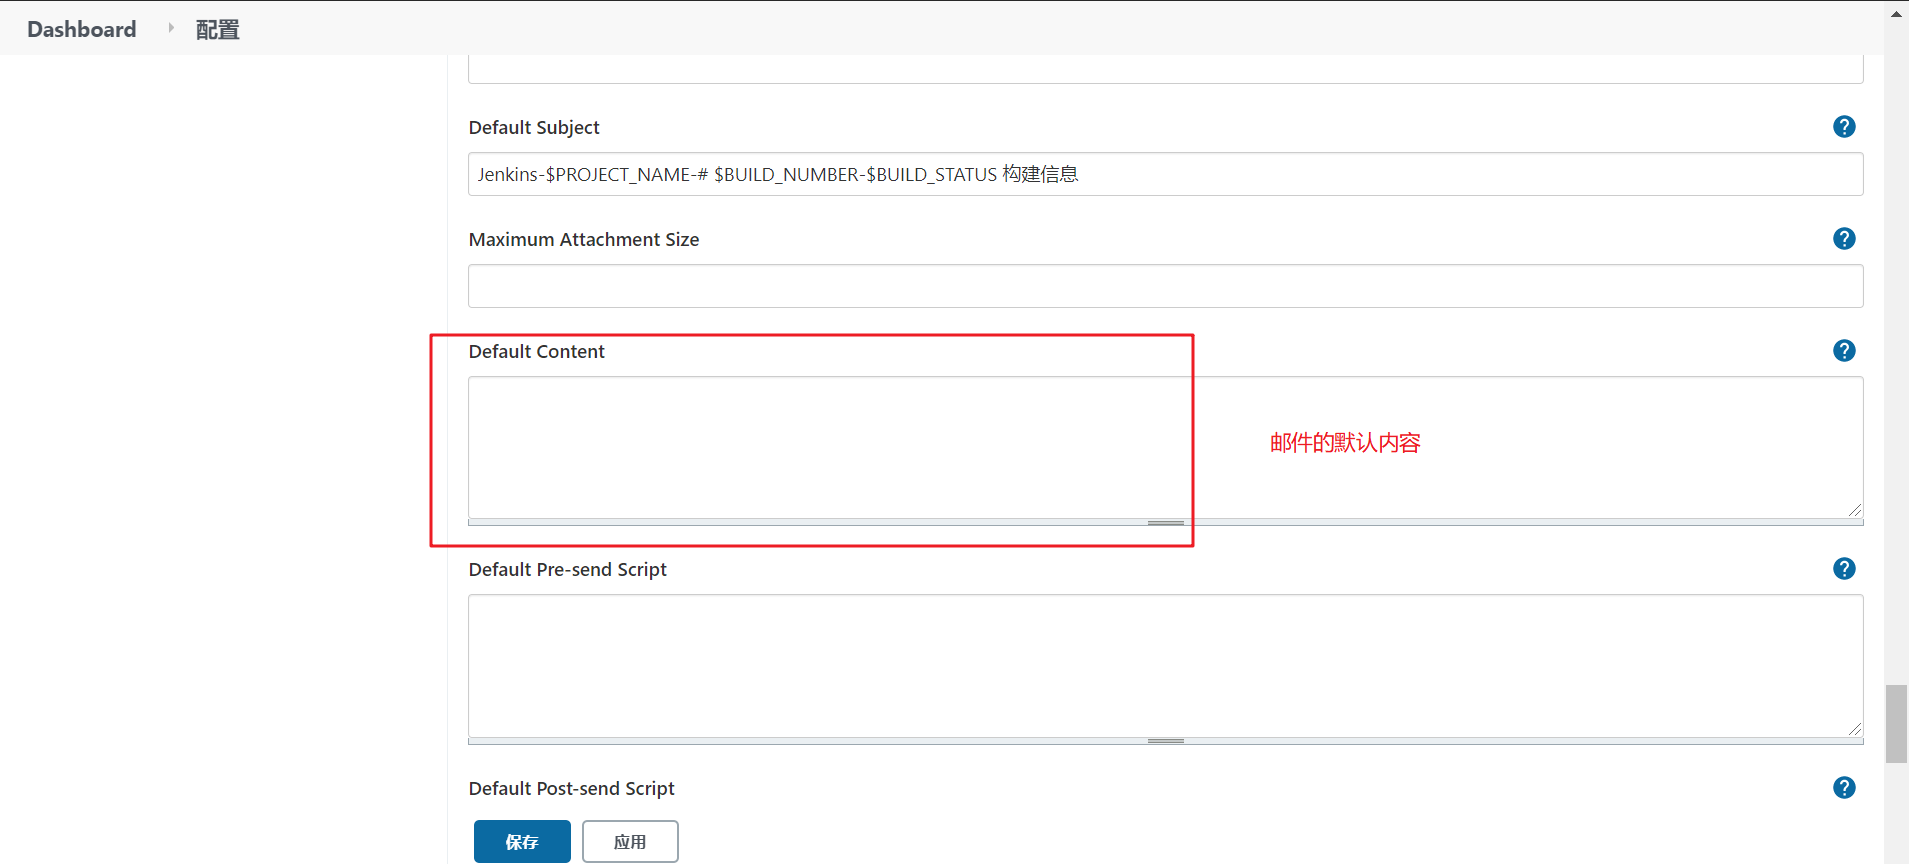
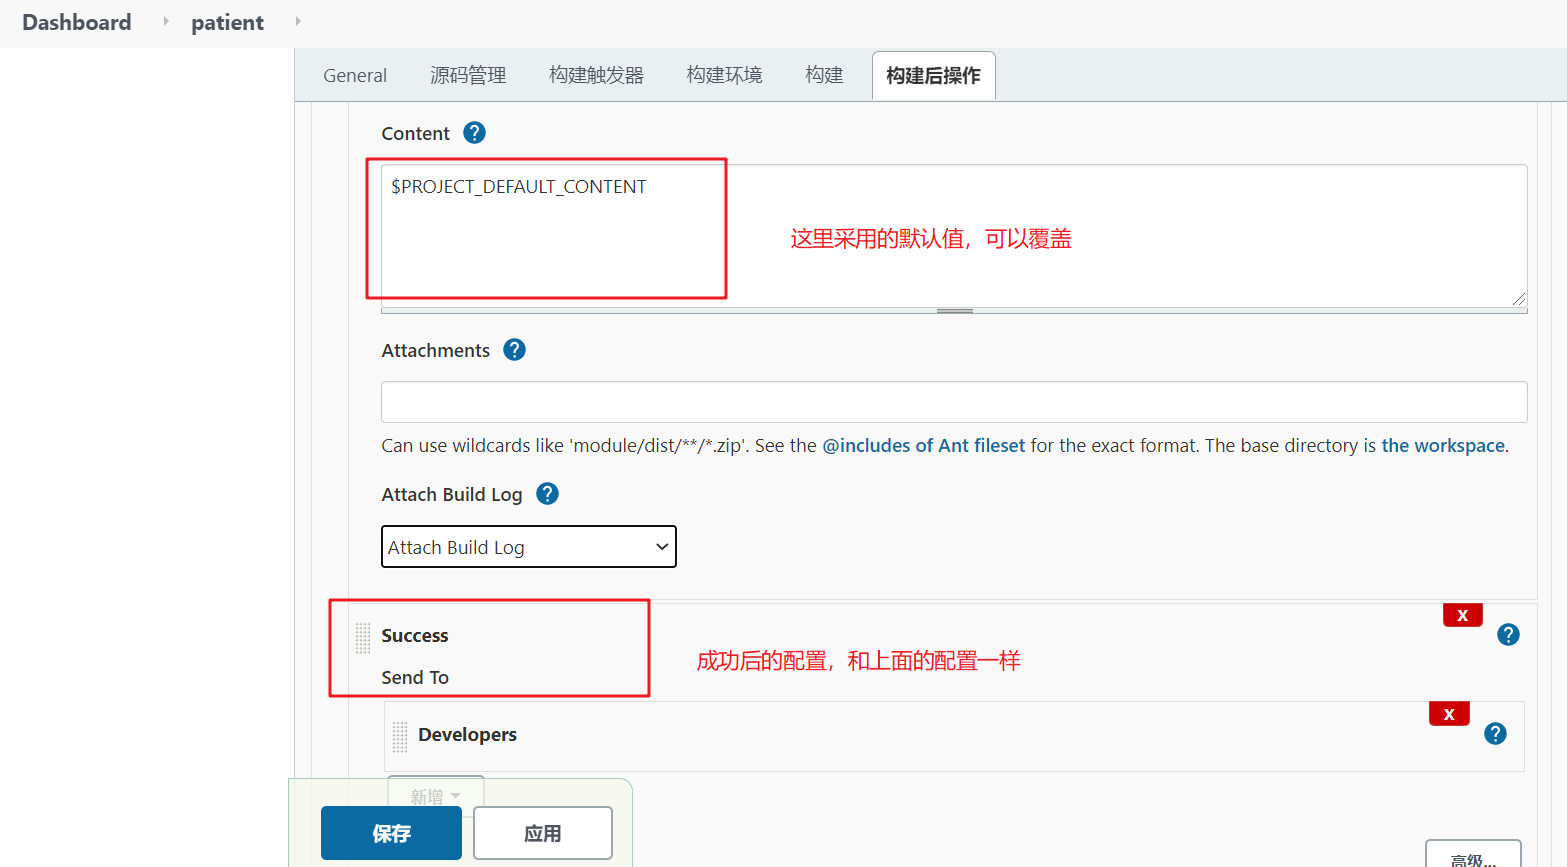
邮件主体模板: 上图中的默认内容部分,可以直接使用以下模板;
<!DOCTYPE html>
    <html>
    <head>
    <meta charset="UTF-8">
    <title>${PROJECT_NAME}-第${BUILD_NUMBER}次构建日志</title>
    </head>

    <body leftmargin="8" marginwidth="0" topmargin="8" marginheight="4"
        offset="0">
        <table width="95%" cellpadding="0" cellspacing="0"
            style="font-size: 11pt; font-family: Tahoma, Arial, Helvetica, sans-serif">
            <tr>
                <td>(本邮件是程序自动下发的,请勿回复!)</td>
            </tr>
            <tr>
                <td><br />
                <b><font color="#0B610B">构建信息($BUILD_STATUS)</font></b>
                <hr size="2" width="100%" align="center" /></td>
            </tr>
            <tr>
                <td>
                    <ul>
                        <li>项目名称 : ${PROJECT_NAME}</li>
                        <li>构建编号 : 第${BUILD_NUMBER}次构建</li>
                        <li>触发原因 : ${CAUSE}</li>
                        <li>项目地址 : <a href="${PROJECT_URL}">${PROJECT_URL}</a></li>
                        <li>构建日志 : <a href="${BUILD_URL}console">${BUILD_URL}console</a></li>
                        <li>工作目录 : <a href="${BUILD_URL}ws">${BUILD_URL}ws</a></li>
                        <li>Allure Report : <a href="${BUILD_URL}allure">${BUILD_URL}allure</a></li>
                    </ul>
                </td>
            </tr>
            <tr>
                <td><b><font color="#0B610B">构建日志(最后100行):</font></b>
                <hr size="2" width="100%" align="center" /></td>
            </tr>
            <tr>
                <td><textarea cols="80" rows="30" readonly="readonly"
                        style="font-family: Courier New">${BUILD_LOG, maxLines=100}</textarea>
                </td>
            </tr>
        </table>
    </body>
    </html>
1
2
3
4
5
6
7
8
9
10
11
12
13
14
15
16
17
18
19
20
21
22
23
24
25
26
27
28
29
30
31
32
33
34
35
36
37
38
39
40
41
42
43
44可以直接粘贴复制使用;
# 邮箱开启SMTP;
电脑端登录你的qq邮箱网页版;
顶部找到:设置->账户;
开启SMTP;点击开启,会自动生成授权码,
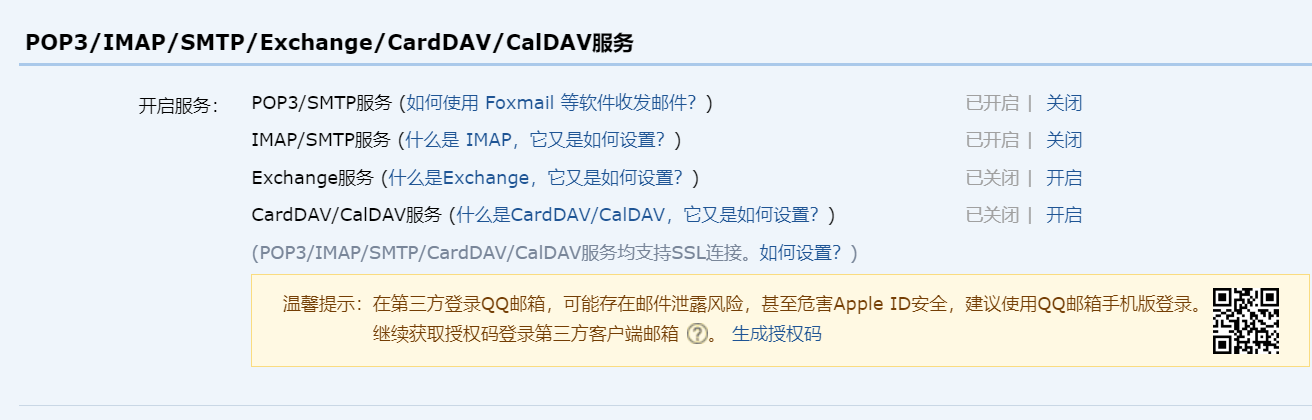
配置结束
# 自由风格的项目
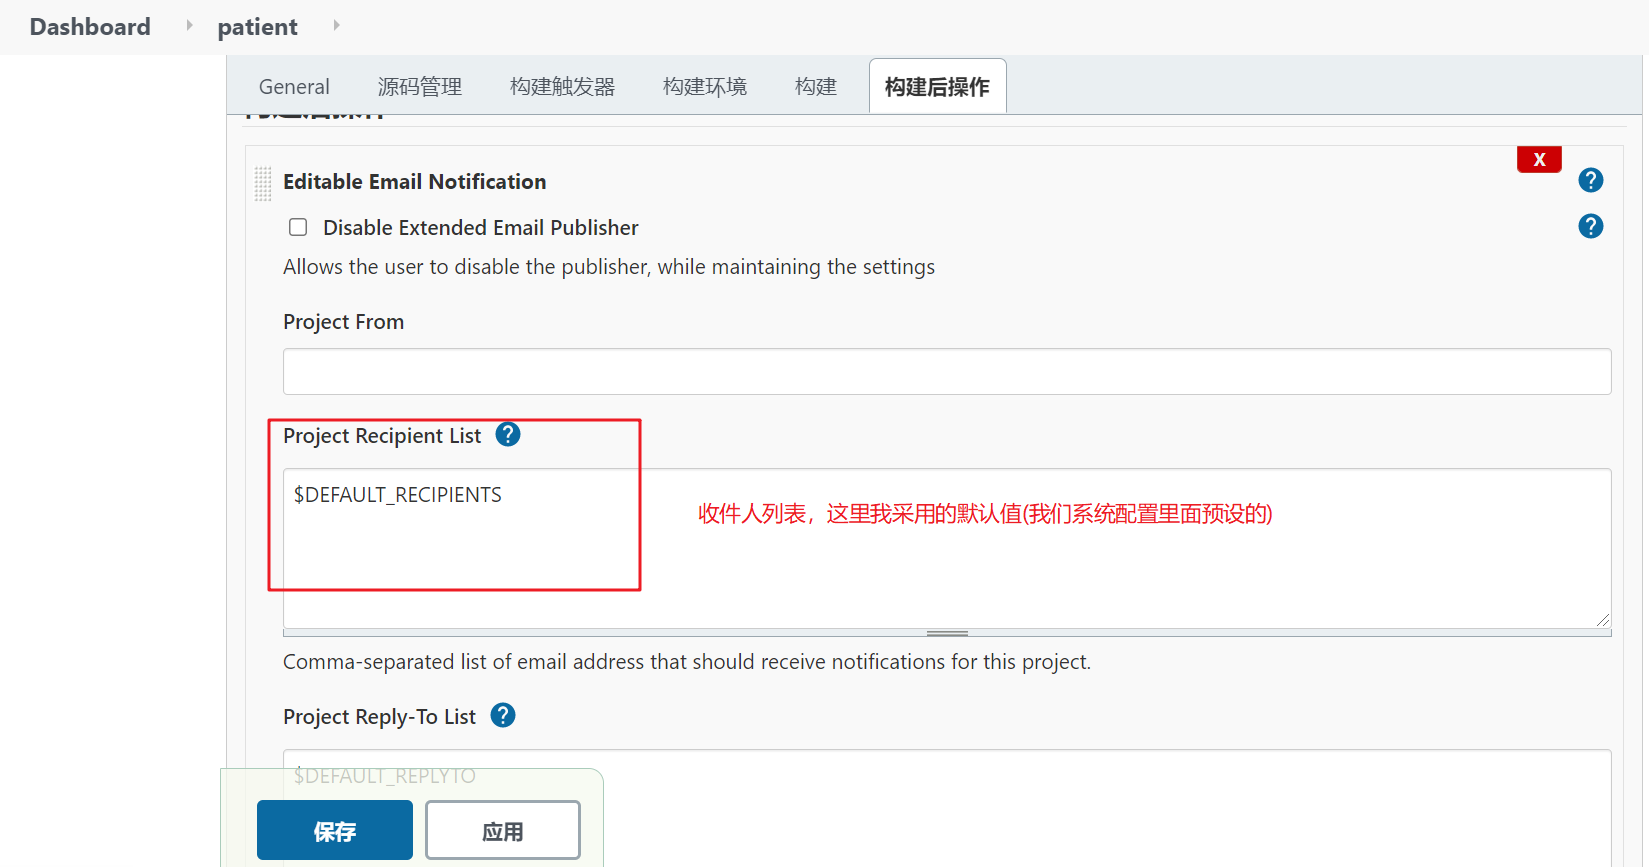
这种风格的项目有一个构建后操作的选项卡,我们可以在里面配置我们的电子邮件;
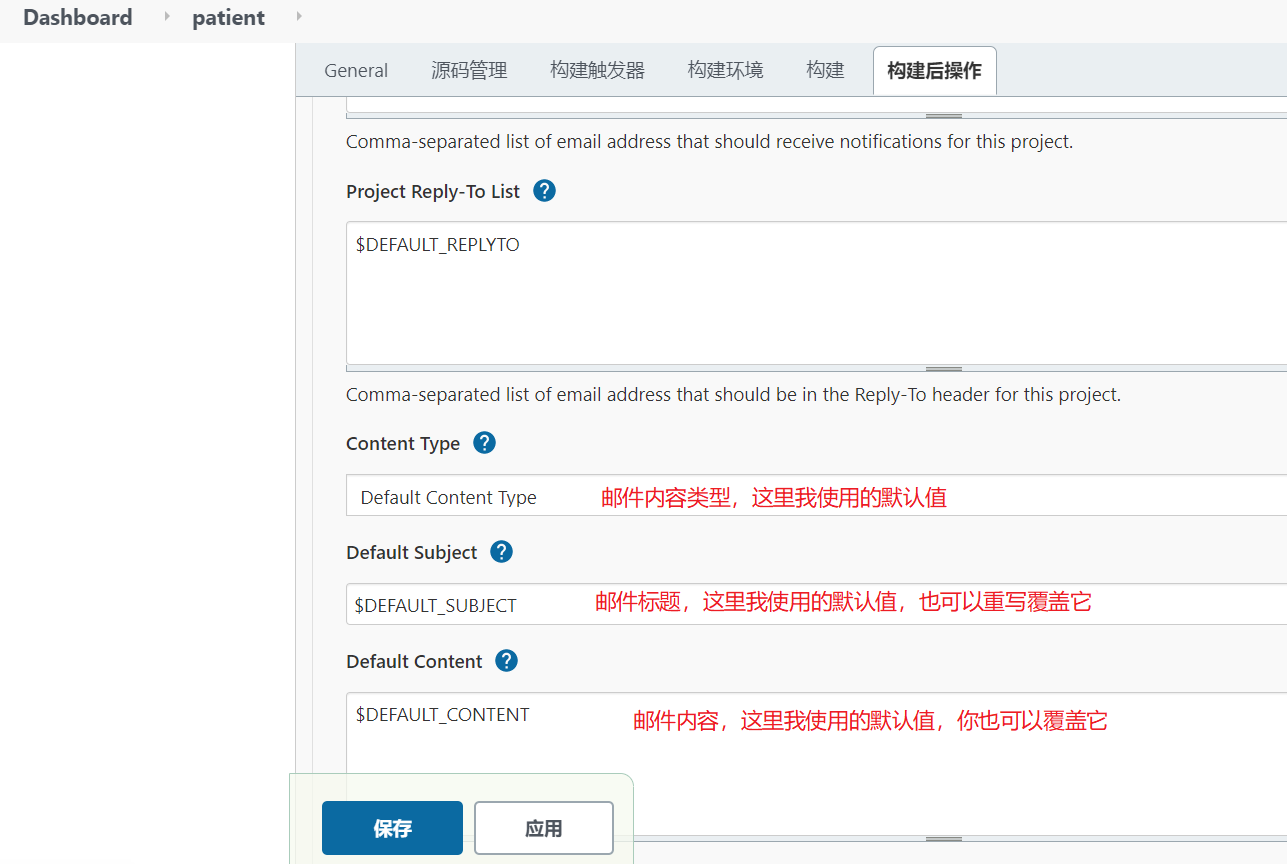
# 构建后操作,填写表单;
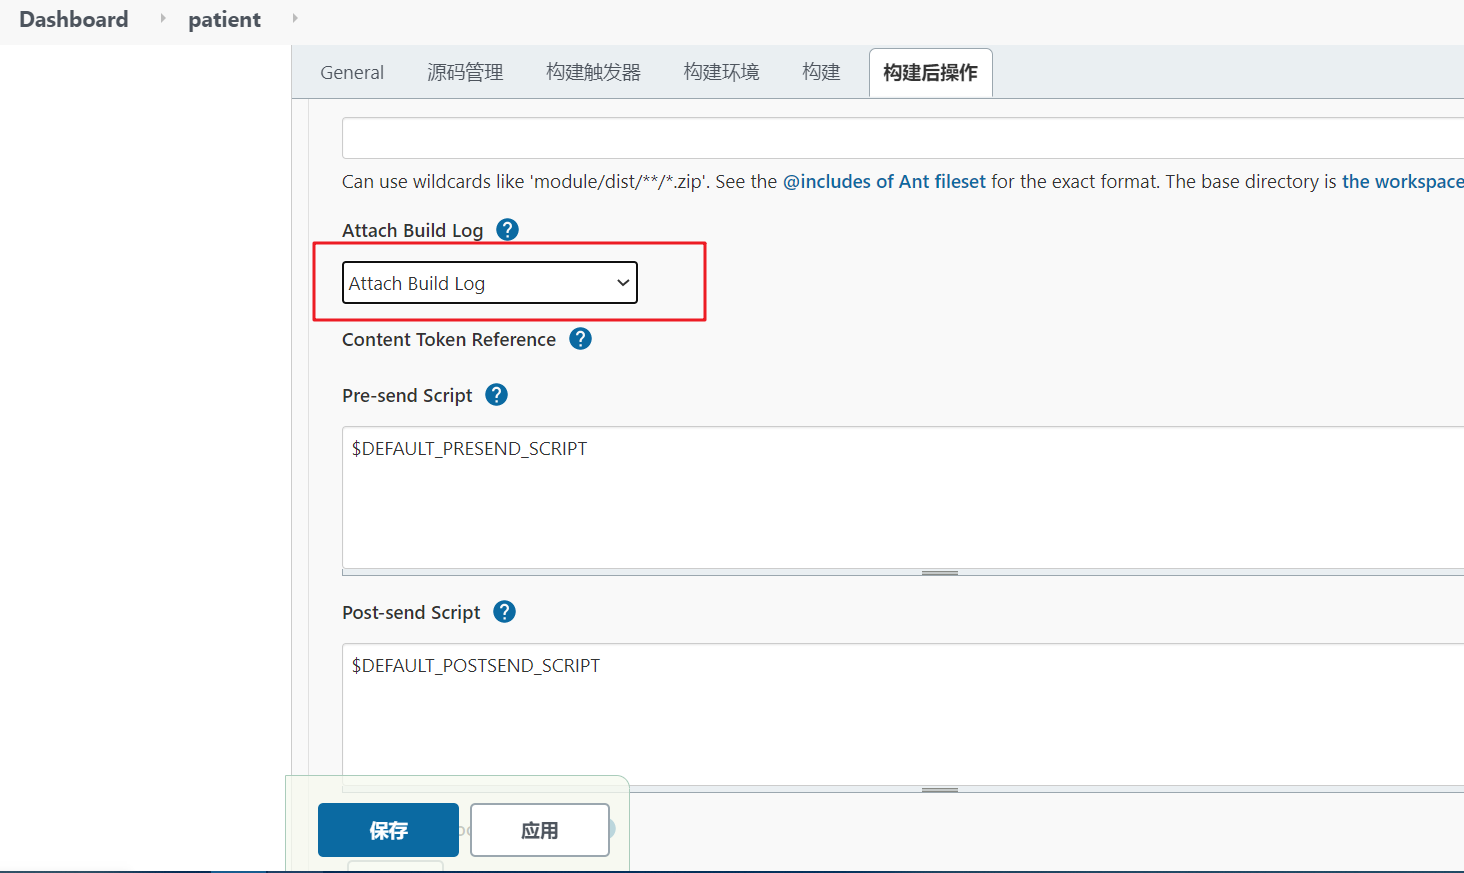
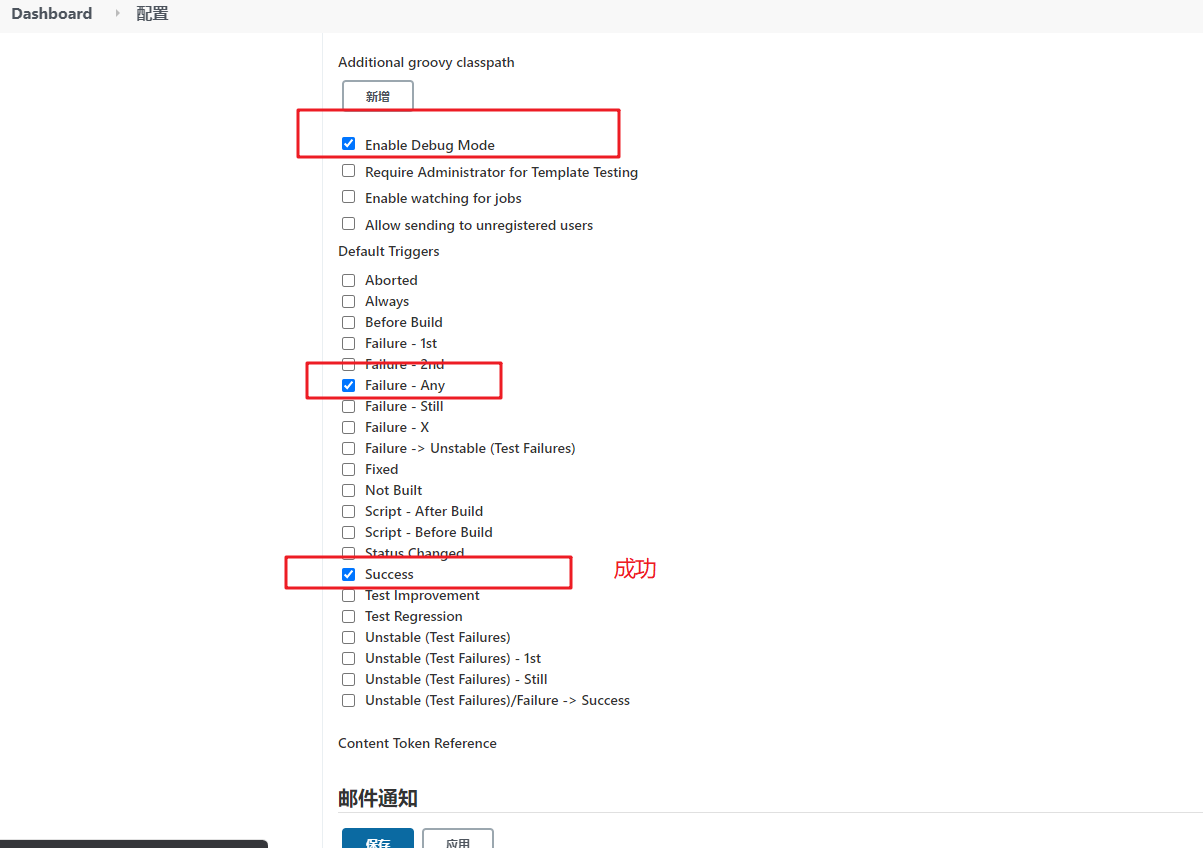
# 触发器;
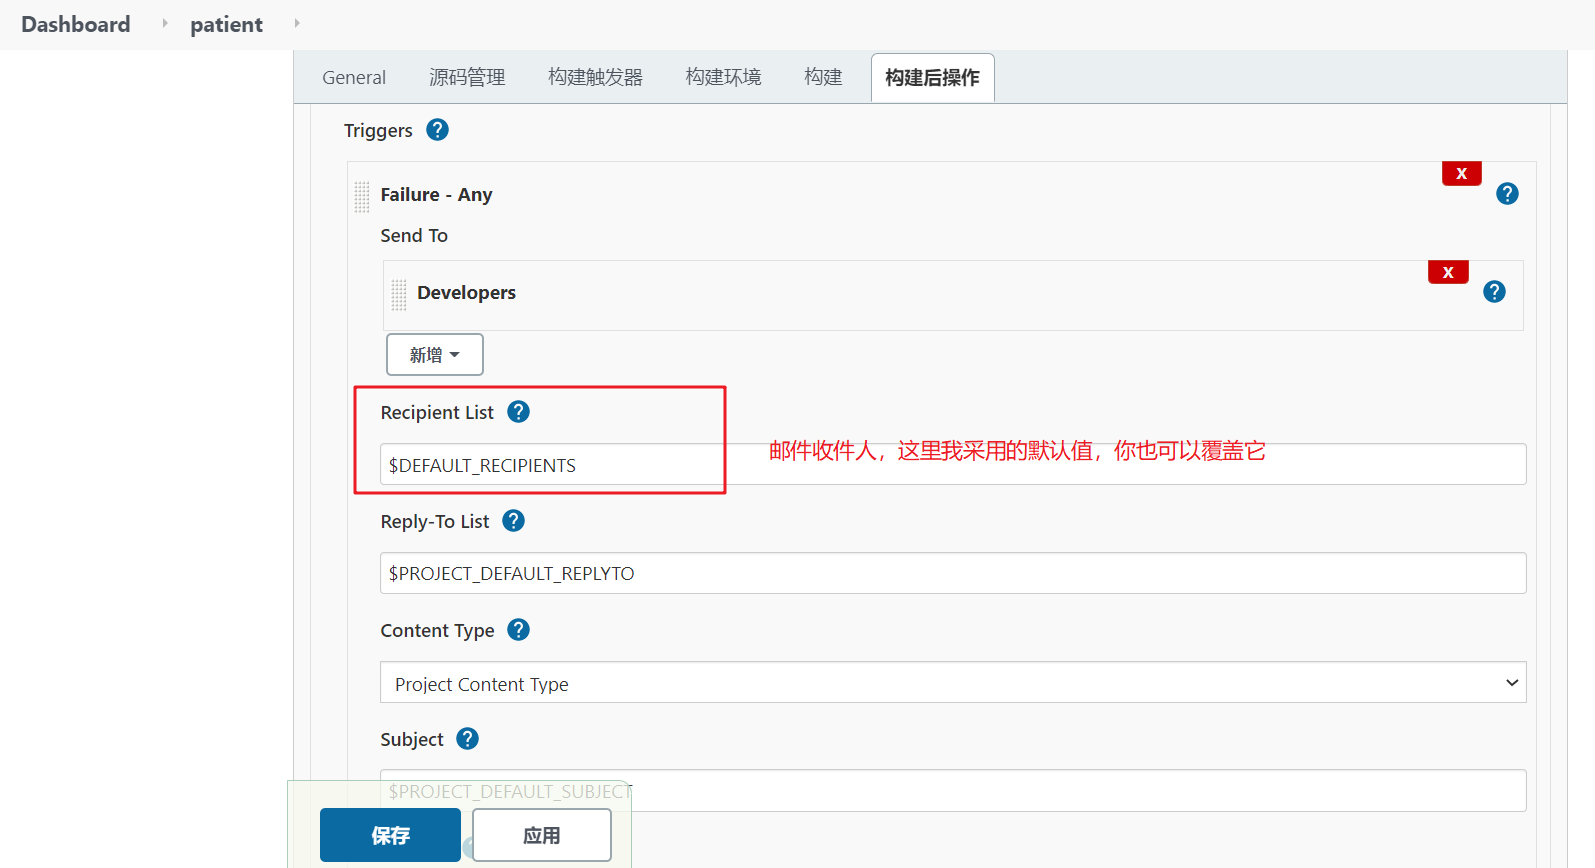
其他表单直接默认值,不修改即可,如有需要也可以自定义配置;
# 构建项目;
构建日志;
Checking if email needs to be generated
Email was triggered for: Success
Sending email for trigger: Success
messageContentType = text/html; charset=UTF-8
Request made to attach build log
  Collecting change authors...
    build: 47
Adding recipients from trigger recipient list
Analyzing: 2576xxx459@qq.com,116xxx2779@qq.com
Looking for: 257xxxx3459@qq.com
	starting at: 0
	firstFoundIdx: 0
	firstFoundIdx-substring: 25763xxx59@qq.com,116xxxx79@qq.com
	=> found type: 0
......
Looking for: 11xxx2779@qq.com
	starting at: 18
	firstFoundIdx: 18
	firstFoundIdx-substring: 116xxx2779@qq.com
	=> found type: 0
Successfully created MimeMessage
Sending email to: 257xxx93459@qq.com 116xx2779@qq.com
Finished: SUCCESS
1
2
3
4
5
6
7
8
9
10
11
12
13
14
15
16
17
18
19
20
21
22
23
2
3
4
5
6
7
8
9
10
11
12
13
14
15
16
17
18
19
20
21
22
23
邮件内容;

# 流水线项目
这里我使用的是脚本式流水线;以下的配置前提是你已经有一个流水线项目,并且完成了前面最基础的配置;
新建一个阶段:'email'
node {
	stage('email') {
	    emailext attachLog: true, body: 'jenkins构建成功', to: '123@qq.com', subject: 'jenkins构建信息';
	}
}
1
2
3
4
5# 参数解释:
- attachLog:表示发送邮件的时候会把日志作为附件,一起发送;
- body:发送的邮件的主体内容;例:jenkins构建成功;
- to:要发送的联系人邮件地址;例:12345@qq.com;
- subject: 邮件的主题;例:jenkins构建信息;
简单流程;
node {
	stage('git clone') {
		git credentialsId: '16fc630b-8061-40f8-9dda-0723a2d79xxx', url: 'https://github.com/xxw-s/documents.git';
		sh 'pwd';
		sh 'ls'
	}
	stage('email') {
	    emailext attachLog: true, body: 'jenkins构建成功', to: '123@qq.com', subject: 'jenkins构建信息';
	}
}
1
2
3
4
5
6
7
8
9
10日志;
......
Looking for: 2576393459@qq.com
	starting at: 0
	firstFoundIdx: 0
	firstFoundIdx-substring: 257xxx459@qq.com
	=> found type: 0
Adding recipients from trigger recipient list
Successfully created MimeMessage
Sending email to: 2576xxx9@qq.com
[Pipeline] }
[Pipeline] // stage
[Pipeline] }
[Pipeline] // node
[Pipeline] End of Pipeline
Finished: SUCCESS
1
2
3
4
5
6
7
8
9
10
11
12
13
14
15邮件内容;
使用全局配置的默认值;
node {
	stage('git clone') {
		git credentialsId: '16fc630b-8061-40f8-9dda-0723a2d7xxx', url: 'https://github.com/xxx-s/documents.git';
		sh 'pwd';
		sh 'ls'
	}
	stage('email') {
	    emailext attachLog: true, body: '''$DEFAULT_CONTENT''', to: '''$DEFAULT_RECIPIENTS''', subject: '''$DEFAULT_SUBJECT''';
	}
}
1
2
3
4
5
6
7
8
9
10这里我使用了三重双引号,这是Groovy的特征,其中三重双引号用于封装多行消息,可以直接插入带有变量的字符串;
body、to、subject,这三处我使用的是默认值(全局配置里预先配置好的);当然你也可以使用这是插件提供的;
# 错误处理;
脚本式流水线没有内置支持构建后处理。在脚本式流水线中,当我们还没有内置功能时,通常依靠Groovy程序结构来提供此功能。这也意味着在这种情况下,我们会使用try-catch-finally机制。然而,Jenkins DSL包含了另一个步骤,可以作为try-catch-finally功能的快捷方式:catchError。这个catchError步骤对多种场景都有用,此处对于构建后用例非常适用。
使用
try catch finally;node { try { stage('git clone') { git credentialsId: '16fc630b-8061-40f8-9dda-0723a2d7xxx2', url: 'https://github.com/wxx-s/documents.git'; sh 'pwd'; sh 'ls' } } catch (err) { // 捕获错误 echo '错误${err}' } finally { // 无论结果如何都执行; stage('email') { emailext attachLog: true, body: '''$DEFAULT_CONTENT''', to: '''$DEFAULT_RECIPIENTS''', subject: '''$DEFAULT_SUBJECT'''; } } }1
2
3
4
5
6
7
8
9
10
11
12
13
14
15
16
17
18
19简写方式:
catchError;node { catchError { stage('git clone') { git credentialsId: '16fc630b-8061-40f8-9dda-0723a2d79xxx', url: 'https://github.com/xxw-s/documents.git'; sh 'pwd'; sh 'ls' } } // 无论结果如何都执行; stage('email') { emailext attachLog: true, body: '''$DEFAULT_CONTENT''', to: '''$DEFAULT_RECIPIENTS''', subject: '''$DEFAULT_SUBJECT'''; } }1
2
3
4
5
6
7
8
9
10
11
12
13
# 整体配置
这是个人的博客项目的流水线的整体配置;如要使用,请预先完成前面的插件配置;
node {
    properties([
        pipelineTriggers([githubPush(), pollSCM('')])
    ])
	catchError {
	    stage('git clone') {
    		git credentialsId: '16fc630b-8061-40f8-9dda-0723a2d7xxx', url: 'https://github.com/xxxw-s/documents.git';
    		sh 'pwd';
    		sh 'ls'
    	}
    	stage('npm install') {
    	   nodejs('node-v12.18.2') {
    	       sh 'node -v && npm -v';
    	       sh 'npm install';
    	    }
    	}
    	stage('npm build') {
    	   nodejs('node-v12.18.2') {
    	       sh 'npm run docs:build';
    	    }
    	}
    	stage('deploy') {
    	   nodejs('node-v12.18.2') {
    	       sh('''
    	       cd ./docs/.vuepress/dist;
    	       tar -zcvf docs.tar.gz *;
    	       mv docs.tar.gz /home/local/webview/documents;
    	       cd /home/local/webview/documents;
    	       tar -zxvf docs.tar.gz;
    	       rm -rf docs.tar.gz
    	       pwd;
    	       ls;
    	       ''')
    	    }
    	}
	}
	stage('email') {
	    emailext attachLog: true, body: '''$DEFAULT_CONTENT''', to: '''$DEFAULT_RECIPIENTS''', subject: '''$DEFAULT_SUBJECT''';
	}
}
1
2
3
4
5
6
7
8
9
10
11
12
13
14
15
16
17
18
19
20
21
22
23
24
25
26
27
28
29
30
31
32
33
34
35
36
37
38
39
40
2
3
4
5
6
7
8
9
10
11
12
13
14
15
16
17
18
19
20
21
22
23
24
25
26
27
28
29
30
31
32
33
34
35
36
37
38
39
40