手写vue
根据前面介绍的mvvm框架,手写一个简单的vue,以进一步的了解vue。目标代码如下:
<!DOCTYPE html>
<html lang="en">
<body>
<div id="app">
    <h1>{{ count }}</h1>
</div>
</body>
<script src="./vue.js"></script>

<script>
    const app = new Vue({
        el: '#app',
        data: {
            count: 1
        }
    })

    setInterval(() => {
        app.count++
    }, 1000);

</script>
</html>
2
3
4
5
6
7
8
9
10
11
12
13
14
15
16
17
18
19
20
21
22
23
# 原理分析
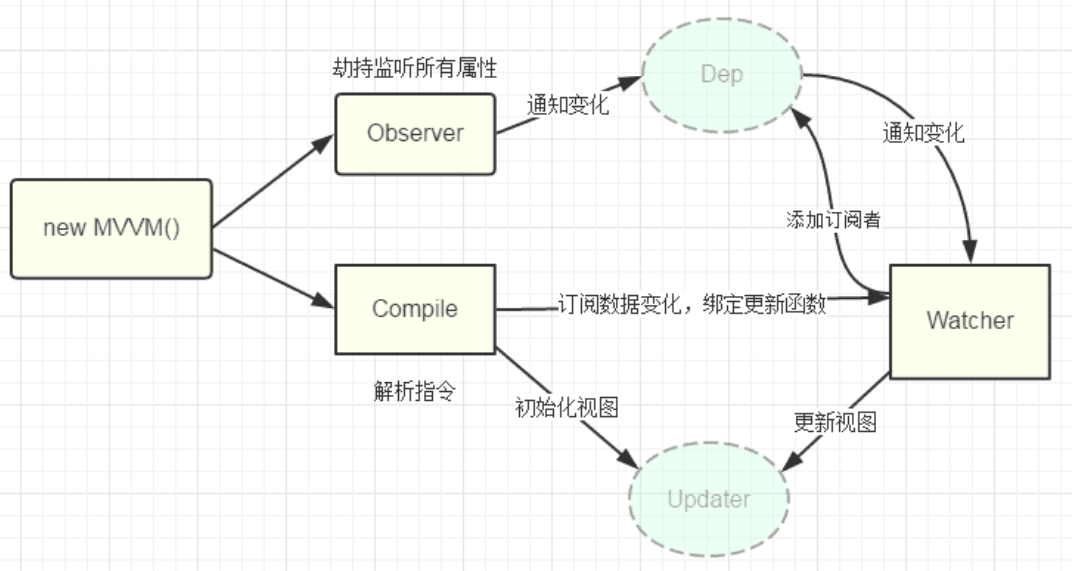
- new Vue() 首先执行初始化,对data执行响应化处理,这个过程发生在Observer中。
- 同时对模板执行编译,找到其中动态绑定的数据,从data中获取并初始化视图,这个过程发生在Compile中。
- 同时定义一个更新函数和Watcher,将来对应数据变化时Watcher会调用更新函数。
- 由于data的某个key在一个视图中可能出现多次,所以每个key都需要一个管家Dep来管理多个Watcher。
- 将来data中数据一旦发生变化,会首先找到对应的Dep,通知所有Watcher执行更新函数 。

# 名词介绍
- KVue:框架构造函数。
- Observer:执行数据响应化(分辨数据是对象还是数组)。
- Compile:编译模板,初始化视图,收集依赖(更新函数、watcher创建)。
- Watcher:执行更新函数(更新dom)。
- Dep:管理多个Watcher,批量更新 。
# vuejs
vue框架的构造函数,对vue进行初始化同时把data进行响应式处理;
class Vue {
    constructor(options) {
        this.$options = options;
        this.$data = options.data;

        // 初始化所有属性
        observe(this.$data)
    }
}

// 封装响应式函数
function defineReactive(obj, key, val) {
    Object.defineProperty(obj, key, {
        get() {
            console.log(`get ${key}:${val}`);
            return val
        },
        set(newVal) {
            if (newVal !== val) {
                console.log(`set ${key}:${newVal}`);
                val = newVal
            }
        },
    })
}

// 劫持监听所有属性;
function observe (obj) {
    if (!(obj instanceof Object) || obj === null || obj === undefined) return;
    new Observer(obj);
}

class Observer {
    constructor(value) {
        this.value = value;
        this.walk(value);
    }

    // 遍历属性转化为响应式
    walk(value) {
        Object.keys(value).forEach((key) => {
            defineReactive(value, key, value[key])
        })
    }
}

window.Vue = Vue;
2
3
4
5
6
7
8
9
10
11
12
13
14
15
16
17
18
19
20
21
22
23
24
25
26
27
28
29
30
31
32
33
34
35
36
37
38
39
40
41
42
43
44
45
46
47
把上面的代码引入到你的目标代码后,你就可以正常访问了,不过现在还没有编译html,需要
$data.count才能访问;
为$data做代理
这样就可以在外面使用app.count来访问属性了,而不需要app.$data.count;
class Vue {
    constructor(options) {
        this.$options = options;
        this.$data = options.data;

        observe(this.$data)
+        proxy(this);
    }
}

// 为vue做代理访问,这样就可以简化访问了;
function proxy (vm) {
    Object.keys(vm.$data).forEach((key) => {
        Object.defineProperty(vm, key, {
            get() {
                return vm.$data[key];
            },
            set(newVal) {
                vm.$data[key] = newVal;
            }
        })
    })
}
2
3
4
5
6
7
8
9
10
11
12
13
14
15
16
17
18
19
20
21
22
23
# 编译模板
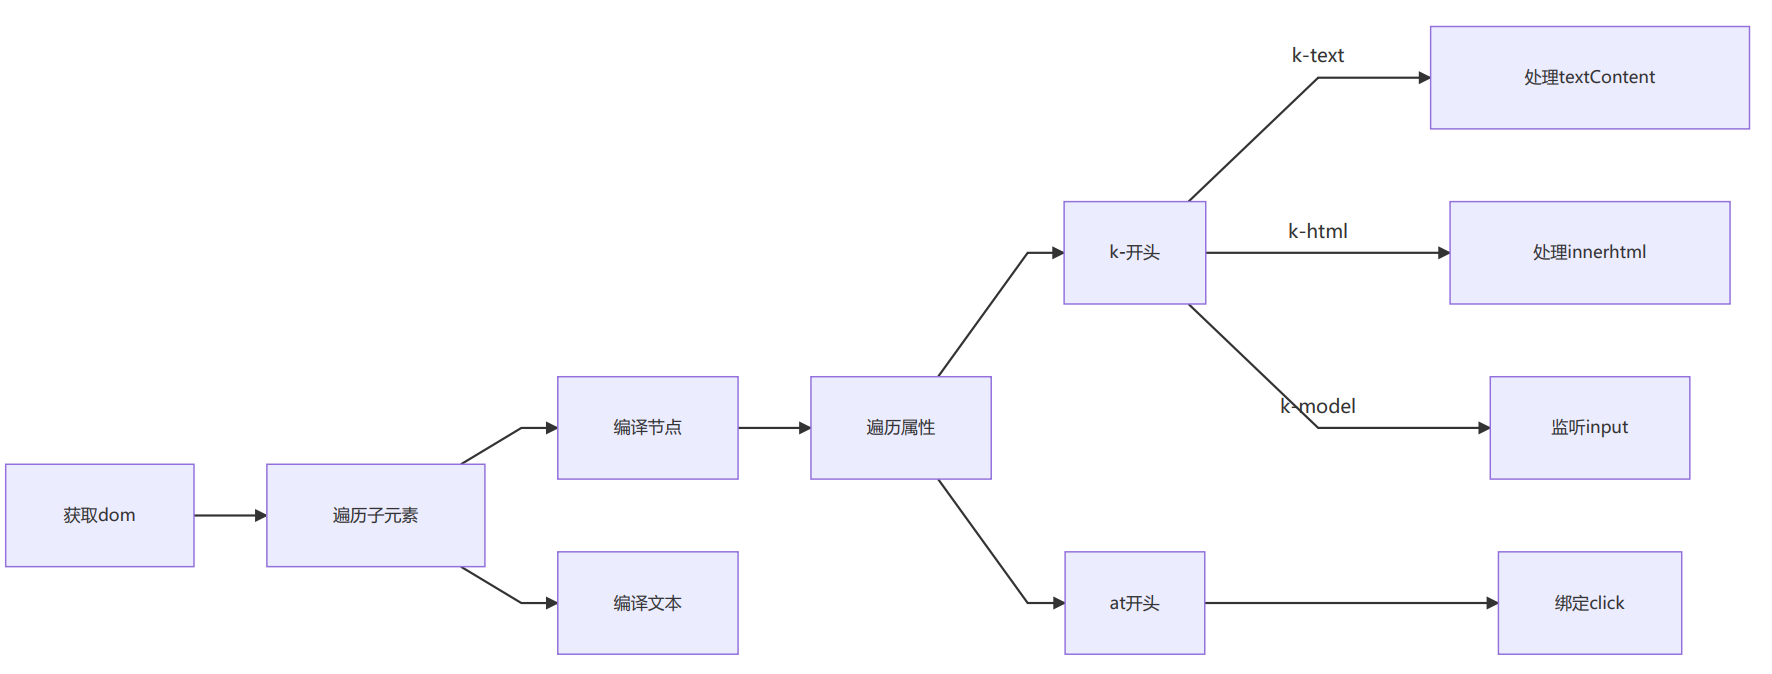
编译模板中vue模板特殊语法,初始化视图、更新视图;

# 初始化视图
class Compile {
    constructor(el, vm) {
        this.$vm = vm;
        this.$el = document.querySelector(el);

        if (this.$el) {
            this.compile(this.$el);
        }
    }

    compile(el){
        const childNodes = el.childNodes;
        // 根据节点类型编译
        Array.form(childNodes).forEach((node) => {
            if (this.isElement(node)) {
                console.log('编译元素' + node.nodeName)
            } else if (this.isInterPolation(node)) {
                console.log('编译插值文本' + node.textContent);
            }
            if (node.chilNodes && node.chilNodes.lenght) {
                this.compile(node);
            }
        })
    }

    isElement(node) {
        return node.nodeType === 1;
    }

    isInterPolation(node) {
        return node.nodeType === 3 && /\{\{(.*)\}\}/.test(node.textContent);
    }
}
2
3
4
5
6
7
8
9
10
11
12
13
14
15
16
17
18
19
20
21
22
23
24
25
26
27
28
29
30
31
32
33
# 编译插值
class Compile {
    ...省略
    compile(el){
        const childNodes = el.childNodes;
        Array.from(childNodes).forEach((node) => {
            if (this.isElement(node)) {
                console.log('编译元素:', node.nodeName)
            } else if (this.isInterPolation(node)) {
                console.log('编译插值文本:', node.textContent);
+                this.compileText(node);
            }
            if (node.childNodes && node.childNodes.length) {
                this.compile(node);
            }
        })
    }
    isElement(node) {
        return node.nodeType === 1;
    }
    isInterPolation(node) {
        return node.nodeType === 3 && /\{\{(.*)\}\}/.test(node.textContent);
    }
+    compileText(node) {
+        node.textContent = this.$vm[RegExp.$1]
+    }
}
2
3
4
5
6
7
8
9
10
11
12
13
14
15
16
17
18
19
20
21
22
23
24
25
26
这个时候你的页面中可以使用插值表达式了,
# 编译元素
class Compile {
    ...省略
    compile(el){
        const childNodes = el.childNodes;
        Array.from(childNodes).forEach((node) => {
            if (this.isElement(node)) {
                console.log('编译元素:', node.nodeName)
+                 this.compileElement(node);
            } else if (this.isInterPolation(node)) {
                console.log('编译插值文本:', node.textContent);
               this.compileText(node);
            }
            if (node.childNodes && node.childNodes.length) {
                this.compile(node);
            }
        })
    }
    isElement(node) {
        return node.nodeType === 1;
    }
    isInterPolation(node) {
        return node.nodeType === 3 && /\{\{(.*)\}\}/.test(node.textContent);
    }
+	compileElement(node) {
        let nodeAttrs = node.attributes;
    	// 遍历node的属性并查找是否有v-html的属性;
        Array.from(nodeAttrs).forEach(attr => {
            let attrName = attr.name;
            let exp = attr.value;
            if (this.isDirective(attrName)) {
                let dir = attrName.substring(2);
                this[dir] && this[dir](node, exp);
            }
        })
    }
+	isDirective(attr) {
        return attr.indexOf("v-") === 0;
    }
+	html(node, exp) {
    	// 替换节点文本
        node.innerHTML = this.$vm[exp]
    }
}
2
3
4
5
6
7
8
9
10
11
12
13
14
15
16
17
18
19
20
21
22
23
24
25
26
27
28
29
30
31
32
33
34
35
36
37
38
39
40
41
42
43
上面的代码可以让我们使用v-html指令,例:
<h1 v-html="html"></h1>
说明
以上代码的实现可以简单的显示插值表达式和v-html指令了,但是现在还缺少视图的更新;
# 依赖收集
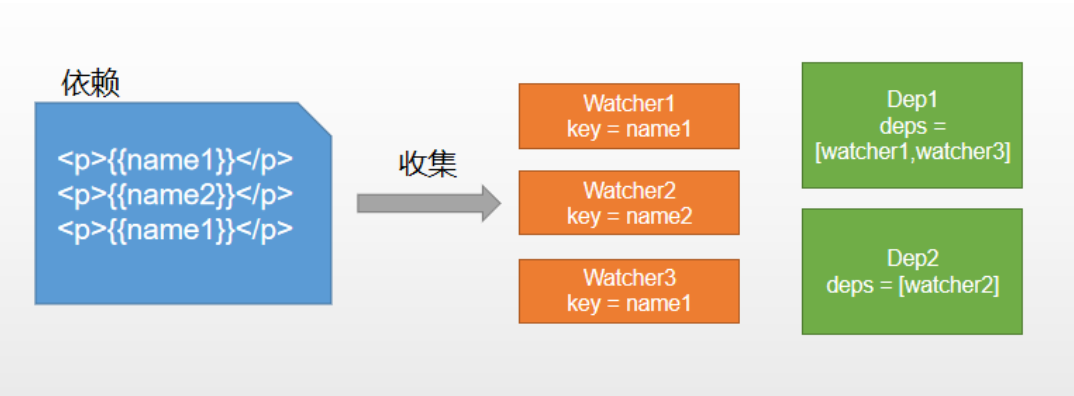
视图中会用到data中某key,这称为依赖。同一个key可能出现多次,每次都需要收集出来用一个Watcher来维护它们,此过程称为依赖收集。
多个Watcher需要一个Dep来管理,需要更新时由Dep统一通知。
例:
new Vue({
        template:
            `
                <div>
                <p>{{ name1 }}</p>
                <p>{{ name2 }}</p>
                <p>{{ name1 }}</p>
                </div>`,
        data: {
            name1: 'name1',
            name2: 'name2',
        },
    });
2
3
4
5
6
7
8
9
10
11
12
13

实现思路
- defineReactive时为每一个key创建一个Dep实例。
- 初始化视图时读取某个key,例如name1,创建一个watcher1。
- 由于触发name1的getter方法,便将watcher1添加到name1对应的Dep中。
- 当name1更新,setter触发时,便可通过对应Dep通知其管理所有Watcher更新。

# 创建Watcher
//临时用于保存watcher测试用
const watchers = [];

// 监听器:负责更新视图
class Watcher {
    constructor(vm, key, updateFn) {
        // kvue实例
        this.vm = vm;
        // 依赖key
        this.key = key;
        // 更新函数
        this.updateFn = updateFn;
        // 临时放入watchers数组
        watchers.push(this)
    }
    // 更新
    update() {
        // 调用保存的更新函数
        this.updateFn.call(this.vm, this.vm[this.key]);
    }
}
2
3
4
5
6
7
8
9
10
11
12
13
14
15
16
17
18
19
20
21
保存着某一个Key的使用者传入的更新函数;
# 编写更新函数
class compile {
    ...省略
    update(node, exp, dir) {
        const fn = this[dir+'Updater']
        fn && fn(node, this.$vm[exp])
        // 首次初始化的时候,创建一个观察者,并传入一个更新函数,更新函数的调用则会更新视图;
        new Watcher(this.$vm, exp, function(val){
            fn && fn(node, val)
        })
    }
    textUpdater(node, val) {
        node.textContent = val;
    }
    htmlUpdater(node, val) {
        node.innerHTML = val
    }
}
2
3
4
5
6
7
8
9
10
11
12
13
14
15
16
17
# 调用更新函数
class compile {
    // v-text
    text(node, exp) {
        // node.textContent = this.$vm[exp];
        this.update(node, exp, 'text')
    }

    // v-html
    html(node, exp) {
        // node.innerHTML = this.$vm[exp]
        this.update(node, exp, 'html')
    }

    // {{xxxx}}
    compileText(node) {
        // node.textContent = this.$vm[RegExp.$1]
        this.update(node, RegExp.$1, 'text')
    }
}
2
3
4
5
6
7
8
9
10
11
12
13
14
15
16
17
18
19
数据发生变更调用不同的更新函数更新视图;
# 更新通知
function defineReactive(obj, key, val) {
    Object.defineProperty(obj, key, {
        get() {
            console.log(`get ${key}:${val}`);
            return val
        },
        set(newVal) {
            if (newVal !== val) {
                console.log(`set ${key}:${newVal}`);
+                watchers.forEach((fn) => fn.update())
                val = newVal
            }
        },
    })
}
2
3
4
5
6
7
8
9
10
11
12
13
14
15
数据发生变更后,我们遍历所有的观察者,将观察者所有收集到的更新函数全局执行一遍,就可以更新视图了;
# 收集watcher
在上面的代码中我们把观察者统一放在了watchers中;然后统一处理调用,但是这样带来的缺点就是,那些没有变更的数据也重复更新了,所以我们要基于key创建一个收集者,专门用于保存某个属性key的观察者。这里我们把依赖收集到dep中。
创建Dep:
class Dep {
    constructor () {
        this.deps = []
    }
    addDep (dep) {
        this.deps.push(dep)
    }
    notify() {
        this.deps.forEach(dep => dep.update());
    }
}
2
3
4
5
6
7
8
9
10
11
在dep中保存当前watcher
class Watcher {
    constructor(vm, key, updateFn) {
        // kvue实例
        this.vm = vm;
        // 依赖key
        this.key = key;
        // 更新函数
        this.updateFn = updateFn;
        // 将当前的watcher保存到dep中
+        Dep.target = this;
        // 读取属性会执行getter函数
+        this.vm[this.key];
+        Dep.target = null;
    }
    // 更新
    update() {
        this.updateFn.call(this.vm, this.vm[this.key]);
    }
}
2
3
4
5
6
7
8
9
10
11
12
13
14
15
16
17
18
19
依赖收集,创建Dep实例:
// 封装响应式函数
function defineReactive(obj, key, val) {
    observe(val);
    // 在对key的值进行响应化的时候,创建一个dep,专门用于收集key的watcher
    const dep = new Dep()
    Object.defineProperty(obj, key, {
        get() {
            console.log(`get ${key}:${val}`);
            // 我们可以从上一步中读取到收集的watcher,然后将其保存到dep中;
            Dep.target && dep.addDep(Dep.target);
            return val
        },
        set(newVal) {
            if (newVal !== val) {
                console.log(`set ${key}:${newVal}`);
                val = newVal
            }
        },
    })
}
2
3
4
5
6
7
8
9
10
11
12
13
14
15
16
17
18
19
20
# 指定派发更新:
// 封装响应式函数
function defineReactive(obj, key, val) {
    observe(val);
    const dep = new Dep()
    Object.defineProperty(obj, key, {
        get() {
            console.log(`get ${key}:${val}`);
            Dep.target && dep.addDep(Dep.target);
            return val
        },
        set(newVal) {
            if (newVal !== val) {
                console.log(`set ${key}:${newVal}`);
                // 通知使用到这个key的所有地方
+                dep.notify();
                val = newVal
            }
        },
    })
}
2
3
4
5
6
7
8
9
10
11
12
13
14
15
16
17
18
19
20
通过
dep.notify()我们就可以通知更新所有使用到这个key的所有观察者,这样dep key watcher就关联到一起了;
# 数组响应式
在前面的代码中我们只实现了对象的响应式,并不能对数组进行响应式,数组的响应式代码如下:
数据的响应式的详细介绍:响应式原理(数组);
添加如下代码:
// 数组的响应式
const originPrototype  = Array.prototype;
const arrayPrototype = Object.create(originPrototype);
// 修改方法 这里我只写了2个 做演示
['push', 'pop'].forEach((method) => {
    arrayPrototype[method] = function () {
        // 原始操作
        originPrototype[method].apply(this, arguments);
        // 通知更新
        const ob = this.__ob__;
        ob.dep.notify();
    }
})

// 往数组对象中添加一个不可遍历属性 __ob__
function def (obj, key, val, enumerable) {
    Object.defineProperty(obj, key, {
        value: val,
        enumerable: !!enumerable,
        writable: true,
        configurable: true,
    })
}
2
3
4
5
6
7
8
9
10
11
12
13
14
15
16
17
18
19
20
21
22
23
修改: Observer
class Observer {
    constructor(value) {
        this.value = value;
        // 用于收集数组的依赖
+        this.dep = new Dep();
        // 用于在数组中获取 observer 执行更新;
+        def(value, '__ob__', this)

        if (Array.isArray(value)) {
            // 往数组上挂载我们修改过的数组方法;
+            value.__proto__ = arrayPrototype;
            // 数组的子项也执行响应式
+            value.forEach((item) => {
                observe(item);
            })
        } else {
            this.walk(value);
        }

    }
...省略
}
2
3
4
5
6
7
8
9
10
11
12
13
14
15
16
17
18
19
20
21
22
修改:defineReactive
// 劫持监听所有属性;
function observe(obj) {
    if (!(obj instanceof Object) || obj === null || obj === undefined) return;
+    return new Observer(obj);
}

// 封装响应式函数
function defineReactive(obj, key, val) {
    // 解决对象嵌套问题
+    const childOb = observe(val);
    // 每读取一个属性就创建一个dep;
    const dep = new Dep()
    Object.defineProperty(obj, key, {
        get() {
            console.log(`get ${key}:${val}`);
            // 收集watcjer
+            if (childOb) {
+                Dep.target && childOb.dep.addDep(Dep.target);
            }
            Dep.target && dep.addDep(Dep.target);
            return val
        },
        set(newVal) {
            if (newVal !== val) {
                console.log(`set ${key}:${newVal}`);
                // 值变化时通知所有watcher
                dep.notify();
                val = newVal
            }
        },
    })
}
2
3
4
5
6
7
8
9
10
11
12
13
14
15
16
17
18
19
20
21
22
23
24
25
26
27
28
29
30
31
32
以上代码的就实现了数组的更新,这个时候你就可以使用push方法,往数组添加元素了;
# 事件绑定
在vue中我们会使用@来绑定事件,是我们用起来很简单,这里就简单实现下;
class Compile {
    ...省略
    compileElement(node) {
        let nodeAttrs = node.attributes;
        Array.from(nodeAttrs).forEach(attr => {
            let attrName = attr.name;
            let exp = attr.value;
            if (this.isDirective(attrName)) {
                let dir = attrName.substring(2);
                this[dir] && this[dir](node, exp);
            }
+            if (this.isEvent(attrName)) {
                // 截取事件名
                const dir = attrName.substring(1);
                // 事件监听
                this.eventHandler(node, dir, exp)
            }
        })
    }

+	isEvent(dir) {
        return dir.indexOf('@') === 0
    }

    // 绑定事件
+    eventHandler(node, dir, exp){
        node.addEventListener(dir, this.$vm.$options.methods[exp].bind(this.$vm))
    }
}
2
3
4
5
6
7
8
9
10
11
12
13
14
15
16
17
18
19
20
21
22
23
24
25
26
27
28
29
添加以上代码后就可以使用
@click来绑定事件了;
# 实现v-model
v-model实际上只是个语法糖而已,它的实质就是绑定了一个事件,然后完成赋值操作了;
class Compile {
	// v-model
    model(node, exp) {
        this.update(node, exp, 'model')

        node.addEventListener('input', e => {
            this.$vm[exp] = e.target.value;
        })
    }

    // 表单元素赋值
    modelUpdater(node, value) {
        node.value = value;
    }
}
2
3
4
5
6
7
8
9
10
11
12
13
14
15
# 完整代码
// vue类
class Vue {
    constructor(options) {
        this.$options = options;
        this.$data = options.data;

        // 初始化data转化为get/set
        observe(this.$data)
        // 代理所有的data
        proxy(this);
        // 编译模板
        new Compile(options.el, this);
    }
}

// 封装响应式函数
function defineReactive(obj, key, val) {
    // 解决对象嵌套问题
    const childOb = observe(val);
    // 每读取一个属性就创建一个dep;
    const dep = new Dep()
    Object.defineProperty(obj, key, {
        get() {
            console.log(`get ${key}:${val}`);
            // 收集watcjer 这一步是处理数组的情况
            if (childOb) {
                Dep.target && childOb.dep.addDep(Dep.target);
            }
            Dep.target && dep.addDep(Dep.target);
            return val
        },
        set(newVal) {
            if (newVal !== val) {
                console.log(`set ${key}:${newVal}`);
                // 值变化时通知所有watcher
                val = newVal
                dep.notify();
            }
        },
    })
}

// 劫持监听所有属性;
function observe(obj) {
    if (!(obj instanceof Object) || obj === null || obj === undefined) return;
    return new Observer(obj);
}

class Observer {
    constructor(value) {
        this.value = value;
        this.dep = new Dep();
        // 添加一个不可遍历属性,并保存Oberver实例
        def(value, '__ob__', this)

        if (Array.isArray(value)) {
            value.__proto__ = arrayPrototype;
            value.forEach((item) => {
                observe(item);
            })
        } else {
            this.walk(value);
        }
    }

    // 遍历属性转化为响应式
    walk(value) {
        Object.keys(value).forEach((key) => {
            defineReactive(value, key, value[key])
        })
    }
}

// 模板编译
class Compile {
    constructor(el, vm) {
        this.$vm = vm;
        // 读取根节点
        this.$el = document.querySelector(el);

        // 初始化根节点
        if (this.$el) {
            this.compile(this.$el);
        }
    }

    compile(el) {
        const childNodes = el.childNodes;
        Array.from(childNodes).forEach((node) => {
            if (this.isElement(node)) {
                console.log('编译元素:', node.nodeName)
                this.compileElement(node);
            } else if (this.isInterPolation(node)) {
                console.log('编译插值文本:', node.textContent);
                this.compileText(node);
            }
            if (node.childNodes && node.childNodes.length) {
                this.compile(node);
            }
        })
    }

    isElement(node) {
        return node.nodeType === 1;
    }

    isInterPolation(node) {
        return node.nodeType === 3 && /\{\{(.*)\}\}/.test(node.textContent);
    }

    compileElement(node) {
        let nodeAttrs = node.attributes;
        Array.from(nodeAttrs).forEach(attr => {
            let attrName = attr.name;
            let exp = attr.value;
            if (this.isDirective(attrName)) {
                let dir = attrName.substring(2);
                this[dir] && this[dir](node, exp);
            }
            if (this.isEvent(attrName)) {
                // 截取事件名
                const dir = attrName.substring(1);
                // 事件监听
                this.eventHandler(node, dir, exp)
            }
        })
    }

    // 判断是否是指令
    isDirective(attr) {
        return attr.indexOf('v-') == 0;
    }

    // v-text
    text(node, exp) {
        this.update(node, exp, 'text')
    }

    // v-html
    html(node, exp) {
        this.update(node, exp, 'html')
    }

    // {{xxxx}}
    compileText(node) {
        this.update(node, RegExp.$1, 'text')
    }

    // 更新并创建watchet
    update(node, exp, dir) {
        const fn = this[dir+'Updater']
        fn && fn(node, this.$vm[exp])
        new Watcher(this.$vm, exp, function(val){
            fn && fn(node, val)
        })
    }
    textUpdater(node, val) {
        node.textContent = val;
    }
    htmlUpdater(node, val) {
        node.innerHTML = val
    }

    isEvent(dir) {
        return dir.indexOf('@') === 0
    }

    // 绑定事件
    eventHandler(node, dir, exp){
        node.addEventListener(dir, this.$vm.$options.methods[exp].bind(this.$vm))
    }

    // v-model
    model(node, exp) {
        this.update(node, exp, 'model')

        node.addEventListener('input', e => {
            this.$vm[exp] = e.target.value;
        })
    }

    // 表单元素赋值
    modelUpdater(node, value) {
        node.value = value;
    }
}

// 监听器:负责更新视图
class Watcher {
    constructor(vm, key, updateFn) {
        // kvue实例
        this.vm = vm;
        // 依赖key
        this.key = key;
        // 更新函数
        this.updateFn = updateFn;
        // 将当前的watcher保存到dep中
        Dep.target = this;
        // 读取属性会执行getter函数
        this.vm[this.key];
        Dep.target = null;
    }
    // 更新
    update() {
        this.updateFn.call(this.vm, this.vm[this.key]);
    }
}

// 依赖收集者
class Dep {
    constructor () {
        // 保存所有的watcher
        this.deps = []
    }
    addDep (dep) {
        this.deps.push(dep)
    }
    // 派发通知
    notify() {
        this.deps.forEach(dep => dep.update());
    }
}


// 数组的响应式
const originPrototype  = Array.prototype;
const arrayPrototype = Object.create(originPrototype);
// 修改方法
['push', 'pop'].forEach((method) => {
    arrayPrototype[method] = function () {
        // 原始操作
        originPrototype[method].apply(this, arguments);
        // 通知更新
        const ob = this.__ob__;
        ob.dep.notify();
    }
})

function def (obj, key, val, enumerable) {
    Object.defineProperty(obj, key, {
        value: val,
        enumerable: !!enumerable,
        writable: true,
        configurable: true,
    })
}

// 为vue做代理访问,这样就可以简化访问了;
function proxy(vm) {
    Object.keys(vm.$data).forEach((key) => {
        Object.defineProperty(vm, key, {
            get() {
                return vm.$data[key];
            },
            set(newVal) {
                vm.$data[key] = newVal;
            },
        })
    })
}

window.Vue = Vue;
2
3
4
5
6
7
8
9
10
11
12
13
14
15
16
17
18
19
20
21
22
23
24
25
26
27
28
29
30
31
32
33
34
35
36
37
38
39
40
41
42
43
44
45
46
47
48
49
50
51
52
53
54
55
56
57
58
59
60
61
62
63
64
65
66
67
68
69
70
71
72
73
74
75
76
77
78
79
80
81
82
83
84
85
86
87
88
89
90
91
92
93
94
95
96
97
98
99
100
101
102
103
104
105
106
107
108
109
110
111
112
113
114
115
116
117
118
119
120
121
122
123
124
125
126
127
128
129
130
131
132
133
134
135
136
137
138
139
140
141
142
143
144
145
146
147
148
149
150
151
152
153
154
155
156
157
158
159
160
161
162
163
164
165
166
167
168
169
170
171
172
173
174
175
176
177
178
179
180
181
182
183
184
185
186
187
188
189
190
191
192
193
194
195
196
197
198
199
200
201
202
203
204
205
206
207
208
209
210
211
212
213
214
215
216
217
218
219
220
221
222
223
224
225
226
227
228
229
230
231
232
233
234
235
236
237
238
239
240
241
242
243
244
245
246
247
248
249
250
251
252
253
254
255
256
257
258
259
260
261
262
263
<!DOCTYPE html>
<html lang="en">
<head></head>
<body>
<div id="app">
    {{count}}
    <h1 v-html="html"></h1>
    {{name}}
    <h1>{{arr}}</h1>
    <button @click="onClick">加</button>
    <h5>{{text}}</h5>
    <input type="text" v-model="text">
</div>
</body>
<script src="./vue.js"></script>
<script>
    const app = new Vue({
        el: '#app',
        data: {
            count: 1,
            name: '小明',
            html: `<p>345</p>`,
            arr: [1,2,3],
            text: '22222222'
        },
        methods: {
            onClick() {
                this.count++;
                console.log(this.count)
            }
        }
    })

    // setInterval(() => {
        // app.count++
        // app.html = `<p>${new Date().toLocaleTimeString()}</p>`
        // app.arr.push(app.count)
    // }, 1000);
</script>
</html>
2
3
4
5
6
7
8
9
10
11
12
13
14
15
16
17
18
19
20
21
22
23
24
25
26
27
28
29
30
31
32
33
34
35
36
37
38
39
40
至此我们的vue框架就结束了,这只是为了学习而实现的一个简单vue框架demo,更复杂的功能就不尝试了,主要就是为了了解veu的工作方式;
